
DevOps has been around for a while now and most developers know more or less what it is. In very simple terms, it means that after every code commit automated checks like code analysis or unit tests run to give fast feedback to the developers. Also, the deployment process is highly automated and shouldn’t contain any manual steps. This idea sounds straight-forward and not too complicated but what about changes on the database? Suddenly the whole process got a lot more complicated.
In this post, we will talk about two popular ways to deploy database changes and also why we prefer the one over the other one.
An Introduction to automated Database deployments
Changes on the database, either automated or manual ones, can be very complex. The first question is, when should these changes be applied? They can be applied either before, after, or during the deployment of your code. No matter when you apply the changes, you have to make sure that your old code and your new code works with or without these changes. We recommend that it should be part of your deployment pipeline. This means that every time you deploy a new version of your code, you also check if there are changes on the database and deploy them if necessary.
A challenge with this approach is that you always want your application to be online. This means that you will have two versions of your application running at the same time. For example, you have an existing table called Customer and with your next deployment, you want to delete the column FaxNumber which was a required field so far. If you delete the column before you deploy your code changes, your application will stop working because it expects the column to be present. If you delete the column after the code deployment, your recently deployed might also run into a problem because there is a column in the database that shouldn’t be there.
The solution to this problem is that you have to split these changes into two deployments. In the first deployment, you can set the column to nullable, and in a later deployment, you can delete the table. This works because your code is not using the table anymore and therefore you can delete it without breaking anything. This also enables you to rollback changes since you only changed a property of the column but the data is still there. This approach is called code first.
Another solution would be database first. Here you build views that verify the version and return the appropriate data. This approach is less testable and you will have a lot of if statements in your database code. Therefore, we recommend going with the code first approach.
On the following screenshot, you can see an overview of database first vs. code first.

Tools to automate Database changes
In this section, we want to give a quick introduction to two different tools which can be used for database changes and also talk about their advantages and disadvantages
FluentMigrator Nuget Package
FluentMigrator is a popular Nuget Package for .NET Core and .NET Framework which can be found on Github. Its advantage (but also disadvantage) is that it is very simple and can be implemented quickly. Each migration is in its own class and inherits from the Migration class. Additionally, each migration overrides the Up() and Down() method which allows you to rollback changes (Down() method). To ensure that a migration runs only once, each migration gets a Migration attribute which will be stored in the FluentMigrator table after it is executed.
An example migration can be found in the samples on Github:
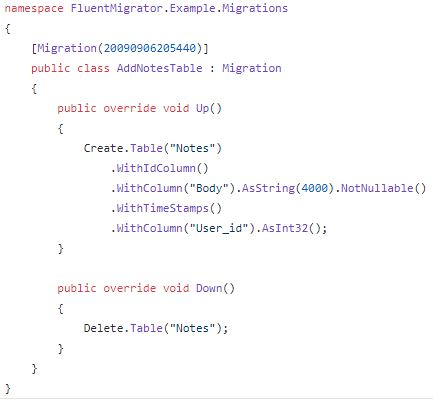
A problem of the attribute is that in a team, several developers might create a migration and use the same migration number. In this case, only one of the two migrations would be executed and there would be also no error. Another problem is that each developer has to write the SQL statements and there is no auto-generated code. FluentMigrator offers helper methods like Create.Table(“TableName”) but the developer has to create the table, its columns and use the right data type and constraints.
Another problem in modern applications is that the migrations are executed on startup. This means every time the application starts, FluentMigrator is checking if it has already executed all migrations before and if it finds an unexecuted one, it executes it. Only after this is finished, the application startup continues. This causes problems in a modern microservice architecture where you often want to start new containers. Additionally, you cant execute the migration when you want. You have to start the application to run the migration.
FluentMigrator is great if you have never used any database automation or if you work on a very small project. Overall we don’t recommend using it though. We recommend using SSDT packages which we will talk about in the next section.
SQS Server Data Tools (SSDT)
SSDT is a project type for relational databases and is integrated into Visual Studio. It enables IntelliSense support and build time validation to find problems fast and help developers to make changes easier. Its main feature is the schema comparison between an existing database and its own definition. For example, if your database has a table Customer with the column FaxNumber and the definition of the Customer table in your SSDT project doesn’t have this column, the SSDT project will delete the column automatically during the deployment. The developer has to write no code for that. On the other hand, if the SSDT project contains tables or even a database that doesn’T exist, the SSDT project will create these tables or even create a new database during the deployment (publish) process. This allows us to quickly set up new environments or a local test system on a developer’s computer.
The SSDT project automatically handles the versioning of the migration. This means no developer has to manually provide a version number and it guarantees that no more conflicts between multiple migrations with the same version number will occur.
On the following screenshot, you can see a table where the migration history is stored.

Additionally, you can save the SSDT project in your version control and can track all changes this way. Another feature of SSDT is to run scripts in different phases of the deployment. You can run scripts before and after the deployment and additionally Reference Data scripts which can be used to change data in the database. The deployment process looks as follows:

We are working with SSDT for several years now and our consultants combined our learnings into our SSDT Data Migration Tool. This tool gives you a starting point for your SSDT project and also additional features like custom execution filters and logging.
Conclusion
This post gave a theoretical introduction to automated database deployments and why we prefer using an SSDT project to deploy database changes. If you are interested in more training or best practices about DevOps, Docker or CI/CD pipelines contact us at info@4tecture.ch.